How to Install Outdoor Porcelain Tile for Patios and Walkways
September 4, 2026
Outdoor porcelain gets installed one of two ways, and picking the right one is the first real decision. The first is a bonded installation, where porcelain tile is set in exterior-rated thinset (the cement-based adhesive that bonds tile to a surface) over a cured, sloped concrete slab. This is the permanent-patio approach. It behaves like traditional tile work and usually calls for a professional. The second is a dry-lay installation, where 2cm porcelain pavers are laid without adhesive over a compacted gravel-and-sand base, on adjustable pedestals for a deck or rooftop, or on engineered base panels. Dry-lay is the more do-it-yourself-friendly route. Drainage, base prep, movement joints, and slip resistance all follow from which method your site needs.
At Bedrosians Tile & Stone, we have supplied outdoor porcelain, pavers, pool coping, and setting materials to homeowners, designers, and contractors for 78 years across 44 showrooms in 11 states. We supply the tile and the materials and we connect you with a trusted local contractor for the installation itself. We do not install tile, so this guide is written to help you understand the process, plan the job correctly, and know when to bring in a pro. If you want to see the range first, our outdoor tile and porcelain tile collections are a good place to start.
Bonded vs. dry-lay: the two ways to install outdoor porcelain
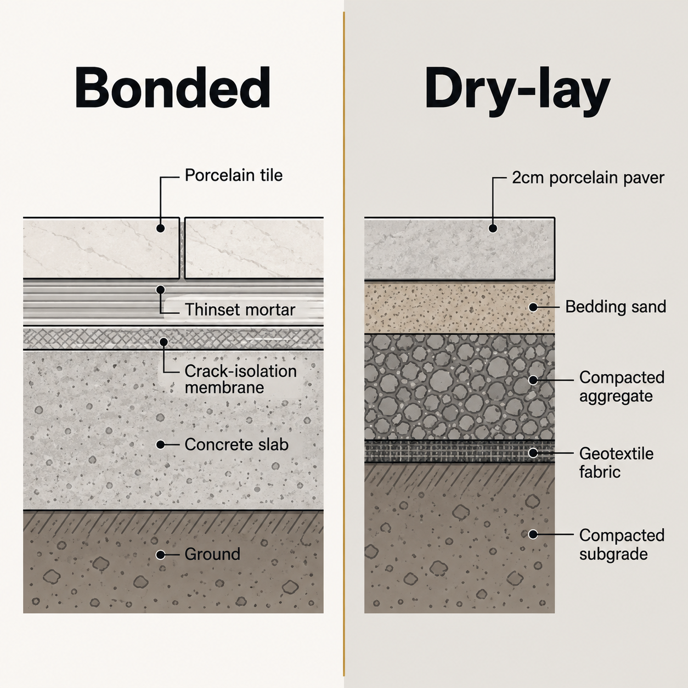
The two methods manage water, weight, and seasonal movement in completely different ways, so keeping them straight matters. Blending the two, such as trying to dry-lay a standard-thickness tile meant for bonding, is one of the most common causes of outdoor tile failure.
A bonded installation rigidly couples the tile, the mortar, and the concrete into one assembly. The slab carries the load, and the porcelain gives you the finished surface. Because everything is locked together, the whole system has to control movement through slope, a crack-isolation layer, and movement joints. Bonded installations are the right call for surfaces that need to match an adjoining interior floor height, for anything that will carry a vehicle, and for a truly permanent patio.
A dry-lay installation lets the surface float. The 2cm pavers rest on a flexible base and stay put through gravity, friction, and a firm perimeter edge rather than adhesive. Open or permeable joints let rain drain straight through into the base, which relieves the water pressure and freeze-thaw stress that damages rigid assemblies. Dry-lay forgives minor ground settlement, and it is far more approachable for a skilled homeowner.
Factor | Bonded (thinset over concrete) | Dry-lay (2cm pavers) |
Tile thickness | Standard porcelain tile or 2cm pavers | 2cm structural pavers only |
Base | Cured, reinforced concrete slab | Compacted gravel and sand, pedestals, or engineered panels |
Drainage | Surface slope to perimeter | Water percolates through open joints |
Movement control | Movement joints and crack-isolation membrane | Flexible base absorbs movement |
Best for | Permanent patios, matching interior floors, vehicular areas | Pedestrian patios, decks, rooftops, balconies |
Who does it | Usually a professional | Skilled DIYer or a pro |
How to choose the right installation method
Your site conditions determine the method, so start there. A few questions settle it quickly:
● Is there an existing concrete slab, or do you want the patio to match an interior floor? That points to a bonded installation. So does any area that will see a car or heavy rolling loads.
● Is this a ground-level pedestrian patio or walkway where drainage and freeze-thaw relief matter most? A dry-lay gravel-and-sand base is a strong fit and the most DIY-approachable.
● Is this an elevated deck, balcony, or flat rooftop? Adjustable pedestals let 2cm pavers sit level over the structure with an open drainage space underneath.
● Do you want to skip several inches of excavation? Engineered base panels can replace much of the aggregate dig for a dry-lay.
If you land on a bonded installation, plan to hire a tile contractor. A bonded outdoor job has to meet strict Tile Council of North America (TCNA) standards, and a mistake usually cannot be fixed by lifting one tile. Our showroom teams can connect you with a trusted local installer and make sure you leave with the right tile and setting materials for the method you have chosen.
Base preparation and drainage
More outdoor porcelain fails from water and movement than from anything else. Poor slope, an uncured or unreinforced slab, a sand bed that is too thick, or missing movement joints will show up as cracked, hollow, or rocking tile within a season or two. Base prep is what makes an outdoor installation last, so give it the time it deserves.
Preparing a concrete slab for a bonded installation
A slab that will receive bonded porcelain should be at least 4 inches thick and internally reinforced with welded wire or rebar. New concrete needs to cure for at least 28 days before any thinset or membrane goes down. During that window the slab shrinks as it dries, and tiling too early puts the fresh bond under stress that leads to debonding and buckling.
Before setting tile, check the slab for problems. Any crack with vertical movement, a slab that is settling, or spalling (flaking or crumbling) concrete disqualifies it for direct bonding. Test the surface for contamination by sprinkling clean water on it. It should soak in within 60 seconds. If the water beads, a curing membrane, sealer, or grease is present and has to be removed mechanically by grinding or shot-blasting. Do not acid wash the slab. It weakens the concrete and leaves salts behind.
Building a gravel and sand base for dry-lay pavers
A dry-lay base carries the load through compaction and interlock, so it is built in layers. Strip the topsoil down to firm native soil and compact it with a plate compactor. Line the excavation with a geotextile separation fabric so soil fines cannot migrate up into the stone. Add several inches of dense-graded aggregate (angular crushed stone, not rounded pea gravel), placing it in shallow lifts and compacting each one. In hard-freeze regions, build the base deeper and use clean, open-graded stone so water drains freely and does not feed the ice lenses that cause frost heave.
On top of the compacted base, screed a thin, even bedding layer of washed concrete sand, roughly an inch deep. Keep it shallow. A thick sand bed shifts under foot traffic and lets 2cm pavers rock and settle, because these pavers are thinner and lighter than traditional concrete units and do not lock into joint sand the same way. Skip play sand, masonry sand, and stone screenings; their rounded grains hold water and wash out. Finally, install a rigid edge restraint around the entire perimeter and spike it into the base. Without a firm edge, the whole field will creep.
Elevated pedestal and engineered-panel systems follow the same logic. Pavers rest loose on the supports, so the perimeter has to be fully contained by a wall, fascia, or fastened metal stop.
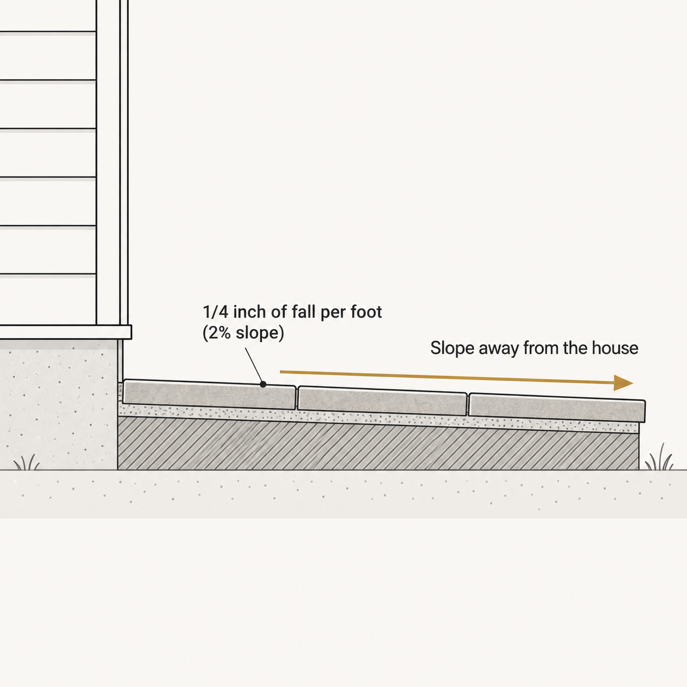
Every outdoor surface needs to shed water away from the house. For a bonded patio, build in a continuous slope of about a quarter inch of fall per foot (a 2% grade) toward a drain, a swale, or the yard, never back toward the foundation. In wet or freezing climates, a bonded installation should also include an uncoupling drainage mat under the mortar bed. This creates a hidden drainage plane so any water that works through the grout joints can escape before it freezes and pops tiles loose. For a dry-lay, the open joints and permeable base handle most drainage, but you still want the finished surface pitched away from the structure.
How to install bonded porcelain tile over concrete
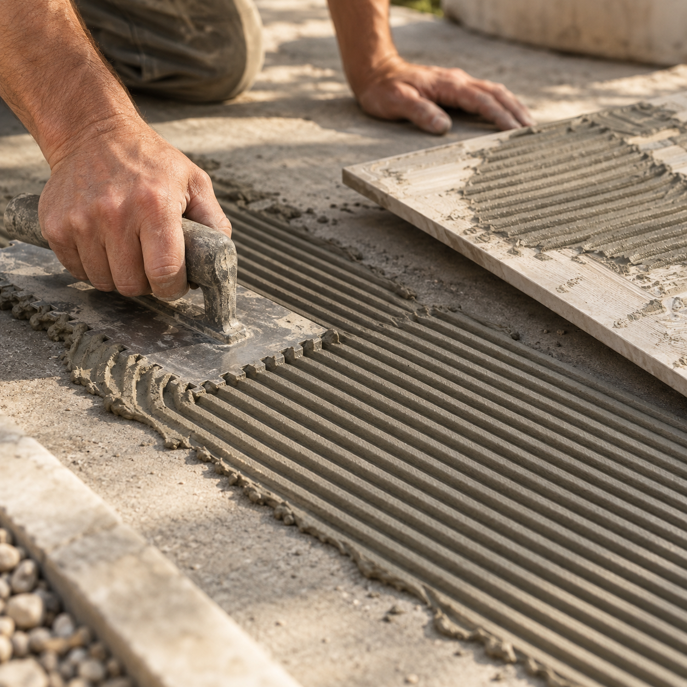
This is a professional-level installation, and the steps below are the sequence a qualified tile contractor follows. Understanding it helps you spec the job and buy the right materials.
Add a crack-isolation or uncoupling membrane. Over a slab, an ANSI A118.12 high-performance crack-isolation membrane (a layer that lets minor slab cracks move without transferring into the tile) protects the porcelain. Any existing control joints or cracks in the slab must be carried up through the assembly, never tiled over solid.
Choose an exterior-rated modified mortar. Outdoor porcelain needs a polymer-modified thinset. ANSI A118.15 is the preferred spec for freeze-thaw climates and heavy traffic. For pavers where any side is 15 inches or longer, use a large-and-heavy-tile (medium-bed) mortar so big pieces stay flat.
Set for full coverage. Key mortar into the slab, comb it in straight parallel lines with a notched trowel, and back-butter the entire back of each paver. Outdoor assemblies need at least 95% void-free mortar contact, compared with 80% for a dry interior floor, because any hollow spot collects water that freezes and shears the bond. Spot-bonding, where mortar is dabbed only at the corners, is not allowed outdoors.
Cut with the right tool. Porcelain is dense, so use a wet saw with a continuous-rim diamond blade. A masonry blade will chip the edges.
Detail the movement joints. Movement joints let the assembly expand and contract with the seasons. Per TCNA guidelines (Detail EJ171), field joints go every 8 to 12 feet in both directions, with a continuous joint anywhere the tile meets a wall, step, or foundation. Reduce the spacing on unshaded patios with dark tile that absorbs heat. Fill these joints with a backer rod and a flexible exterior sealant, never rigid grout.
Grout with an exterior-rated product. Use a high-performance polymer-modified cement grout or a pre-mixed resin grout formulated for outdoor use. If you use epoxy grout, confirm it is rated for exterior UV exposure, since standard interior epoxy can yellow in sunlight.
Because a bonded exterior installation has to hit every one of these details before the mortar skins over in the sun, it rarely makes sense as a DIY project. This is the point to bring in a contractor. Our pro counters stock the exterior tile setting materials a contractor needs, including mortars, grouts, and sealers from established partners such as Laticrete, Custom Building Products, Miracle Sealants, and Drytreat.
How to install dry-lay porcelain pavers
Dry-lay is the method most homeowners can tackle, provided the base is built correctly. The pavers themselves must be 2cm porcelain pavers, which are pressed and fired to span and carry loads without backing. Standard-thickness porcelain tile will snap under a point load if it is dry-laid, so never substitute it.
Confirm the base is compacted and screeded. The finished surface starts with the base, so do not shortcut the earlier steps.
Lay the pavers. Set each 2cm paver onto the bedding, keeping consistent spacing. For long rectangular pavers in a running-bond (staggered) pattern, keep the offset to no more than one-third of the paver length. A full 50% offset can leave a visible lip, because large pavers bow slightly during firing.
Fill the joints. Traditional cement grout cannot be used over a flexible base; it will crack. Instead, use a polymeric jointing sand made specifically for porcelain pavers, or an air-cured resin jointing compound. These lock the pavers together while still letting water drain, and they discourage weeds. Both need a stretch of dry weather to cure.
Set the field. Compact or seat the pavers per the jointing product's instructions, and confirm the perimeter edge restraint is holding everything tight.
For a high-traffic walkway, an engineered base panel or a bonded concrete installation gives you a more stable surface than a plain sand bed. You can browse suitable formats in our pavers collection.
Choosing slip-resistant outdoor porcelain
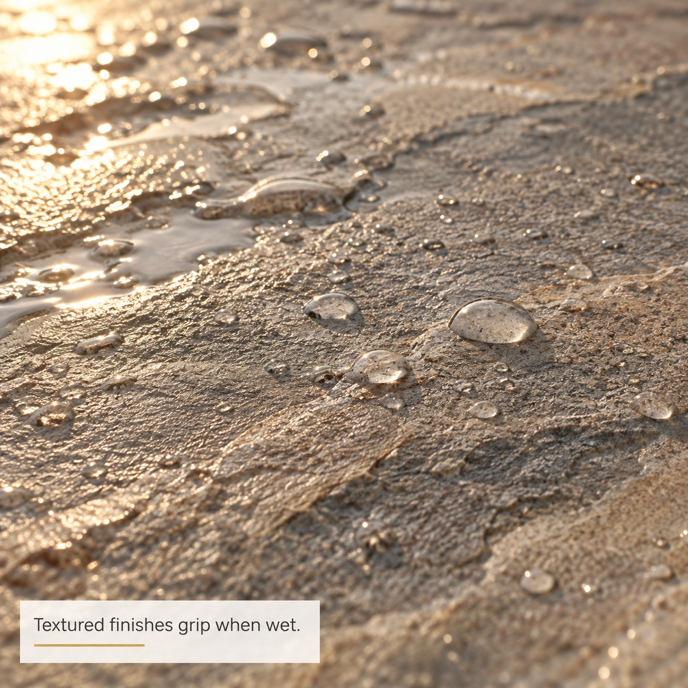
An outdoor surface that gets wet needs more grip than a dry interior floor. That makes the tile's slip rating something to get right before you buy. Two rating systems show up on porcelain, and both are worth knowing.
In the United States, slip resistance is measured as the dynamic coefficient of friction (DCOF) under the ANSI A326.3 standard. A DCOF of 0.42 is the wet minimum for an interior floor. Outdoor surfaces need more grip. Look for a DCOF of 0.55 or higher for a patio or walkway, and 0.60 or higher around a pool. Those figures sit in the exterior wet range, above what a tile built only for interior use will meet. Many outdoor pavers also carry a European R-rating, which comes from a ramp test where a tester walks a wetted incline. R10 suits a covered porch, R11 is the target for an uncovered patio or walkway, and R12 is common for ramps and pool surrounds. Around a pool where people walk barefoot, look for a heavily textured surface and consider matching pool coping.
Bedrosians carries outdoor-rated, anti-slip porcelain, including the Sinai R11 outdoor porcelain collection, so you can specify grip and look together. For more on the ratings, our guide on understanding DCOF and picking safer tile for wet areas breaks it down, and our pool coping options round out a pool deck. One easy way to check grip in your own conditions is to order samples. Our tile samples are $1 each, or 5 free with code SHIPFREE5, so you can feel the finish in your own outdoor light before you commit.
Where the tile goes | ANSI A326.3 | R-rating |
Covered porch | 0.42 minimum (interior-wet grade) | R10 |
Uncovered patio or walkway | 0.55 or higher | R11 |
Pool surround or ramp | 0.60 or higher | R11 or R12 |
Common outdoor porcelain failures and how to avoid them
Almost every failure traces back to a skipped step in base prep, coverage, movement, or drainage. Watch for these:
● Hollow-sounding or debonded tile. Caused by less than 95% mortar coverage or a skipped back-butter. The voids fill with water that freezes and breaks the bond. Fix it by setting for full coverage and back-buttering every paver.
● Tenting or buckling. Tile courses lift off the slab when movement joints are left out. As the surface heats, the tile field has nowhere to expand. Detail the joints per TCNA spacing and honor every joint in the slab below.
● Efflorescence. White salt crusts appear when water pools in an unsloped mortar bed. A proper slope and a drainage mat carry the water away before salts can form.
● Rocking or sinking pavers. In a dry-lay, this comes from a sand bed that is too thick or a base that was not compacted in lifts. Keep the bedding shallow and compact the aggregate properly.
● Reflective cracking. A crack in the slab telegraphs straight up through the tile when it is bonded across a control joint without a crack-isolation membrane. Isolate the joints and use the membrane.
For a fuller reference on outdoor tile standards, the Tile Council of North America publishes exterior installation guidance that professionals rely on.
Do outdoor porcelain tile and pavers need to be sealed?

No. Porcelain has a water absorption rate at or below 0.5%, which means it is essentially impervious and a sealer cannot soak in. A topical sealer on porcelain leaves a cloudy film that traps dirt and reduces slip resistance. What can benefit from sealing is cementitious grout, since standard cement grout is porous. Seal cement grout lines with a breathable penetrating sealer to slow moisture and efflorescence. Polymeric sand and resin jointing compounds are already bound and do not need it.
Day-to-day maintenance is simple: sweep, rinse with a hose, and use a neutral-pH tile cleaner when needed. If you pressure wash to clear winter grime, keep the pressure moderate, hold the wand back from the surface, and use a wide-fan tip so you do not blast out the joint sand. Our guide to long-term care for porcelain tile outdoors covers mold, mildew, and grime in more detail.
Planning materials and budget
Order about 10% extra tile to cover cuts and breakage, and closer to 15% for diagonal, herringbone, or curved layouts with more off-cuts. For a bonded job, budget for the membrane, exterior mortar, grout, movement-joint sealant, and grout sealer. For a dry-lay, budget for the aggregate base, geotextile fabric, washed concrete sand, edge restraint, and jointing sand. Costs vary widely by region, site conditions, and whether you hire out the work, so if you want real numbers, our breakdown of how much outdoor tile costs is the place to plan a budget. Working on a full outdoor cooking space? Our guide to the best tile for an outdoor kitchen pairs well with this one.
Start your outdoor porcelain project with Bedrosians
We have spent 78 years helping people choose the right tile and get it installed properly. We can help you match outdoor-rated porcelain to your patio, walkway, or pool deck, pull the exterior setting materials your contractor will need, and connect you with a trusted local installer through your nearest showroom. Order $1 samples (or 5 free with SHIPFREE5) to test the color and slip finish in your own space, browse the outdoor tile collection online, or call us at (559) 275-5000 and we will point you to the right showroom for your project.

