How to Replace a Single Cracked Tile: A Step-by-Step Guide
September 8, 2026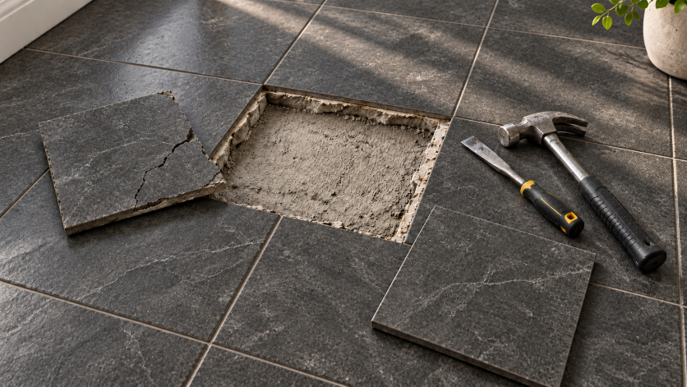
Replacing a single cracked tile comes down to a short sequence of steps. Confirm the tile actually needs replacing, clear the grout around it, break it out from the center so you don't harm its neighbors, scrape the cavity clean and flat, set a matching replacement in fresh thinset mortar, and grout the joints once everything cures. Most of that is manageable for a careful first-timer. The hard part is usually finding a replacement tile that matches the ones already on your floor or wall.
At Bedrosians Tile & Stone, matching tile is something we help with every day. We have been a family-owned tile and stone company for 78 years, with 44 showrooms across 11 states where you can bring in a broken piece to match, a deep catalog of porcelain, ceramic, terracotta, natural stone, and mosaics, and $1 samples so you can check a match in your own lighting before you commit. We supply the tile and the setting materials for a job like this. We do not install, so this guide walks through the DIY process and flags the points where it is worth calling in a professional.
Should you repair or replace a cracked tile?
Decide this before you pry anything loose. Not every cracked tile needs to come out, and unnecessary demolition can chip the tiles around it or, in a shower, puncture the waterproofing underneath.
Two quick checks tell you most of what you need to know:
● The fingernail test. Run a fingernail across the crack. A fine, static hairline crack that you cannot catch a nail on, with the tile still solidly stuck down, is often a candidate for a cosmetic fill rather than a full replacement.
● The tap test. Tap the damaged tile and the ones next to it with the handle of a screwdriver or a small block of wood. A tile that is still well bonded gives a solid, ringing sound. A dull or hollow sound means the bond underneath has failed, and that tile should come out no matter how minor the surface damage looks.
Use the table below to point yourself in the right direction.
Lean toward a cosmetic fill when | Replace the tile when |
The crack is a fine hairline you cannot feel with a fingernail | The crack goes all the way through the tile or breaks it into pieces |
The tile is solidly bonded (solid tap sound) | The tile sounds hollow or has come loose |
The damage is a small surface chip in a low-traffic spot | Edges are lifting, buckling, or sitting unevenly against the surrounding tiles |
The tile is on a dry wall or low-use floor | The tile is in a wet area, like a shower floor, where water can get in |
A color-matched two-part epoxy can fill a true hairline crack or a small chip. Clean the crack, degrease it, fill it just above the surface, scrape it flush, and match the surrounding sheen. Keep in mind that epoxy and resin fills are a cosmetic fix. They can scuff, collect dirt along the edges, and yellow in sunlight over time, so they work best in low-visibility, low-traffic spots rather than a busy kitchen floor. If the tile fails any of the replacement checks above, plan on swapping it out.
How to match a replacement tile
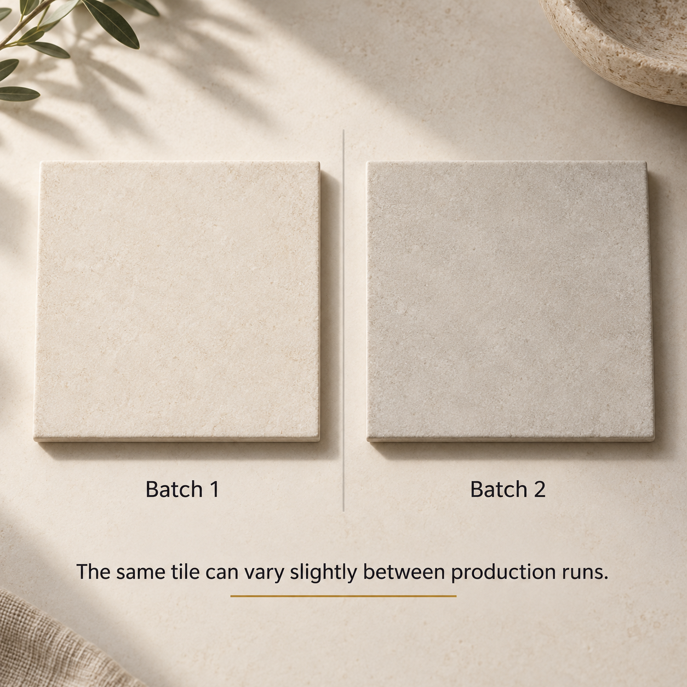
Tiles are fired from natural clays and minerals, and small differences in the raw material, kiln temperature, and firing time create real variation between production runs. Two tiles sold under the same name and size can differ slightly in color and shade if they came from different batches, something the industry calls dye-lot variation. Two tiles can even look identical in a showroom and then read differently under the LED lights or daylight in your own room.
Here is how to give yourself the best chance at a match, in order of preference:
● Start with leftover tile from the original job. Extra tiles saved from the initial installation, sometimes called attic stock, are the best possible source. They came from the same batch, so the color, size, and thickness already match. Check the garage, the basement, and the back of closets before you do anything else.
● Harvest a hidden tile. If there is no leftover stock, you can sometimes borrow a matching tile from a spot no one sees, such as under a freestanding range, behind an appliance, or inside a vanity toe-kick. Move that tile into the visible area, then set a close-enough replacement in the hidden spot.
● Match at a showroom. When neither of those works, take a cleaned piece of the broken tile to a specialty tile showroom. Our showroom teams look at the size, thickness, edge shape, and finish to find the closest current match, and many of them have decades of experience doing exactly this. You can also browse our full tile catalog to hunt for a match by look, size, and finish.
● Turn a mismatch into a feature. If an exact match simply is not available, a single slightly off tile can stand out as an obvious patch. A cleaner solution is to make the repair intentional, swapping in a decorative accent, a small mosaic inset, or a contrasting border so the change reads as a design choice.
Before you buy a full box, confirm the match in your own space. Order $1 samples online, or get five free with the code SHIPFREE5, and hold them against your existing tile in the actual lighting of the room. Our Try Before You Buy sampling guide walks through how to do this well, and you can order tile samples here.
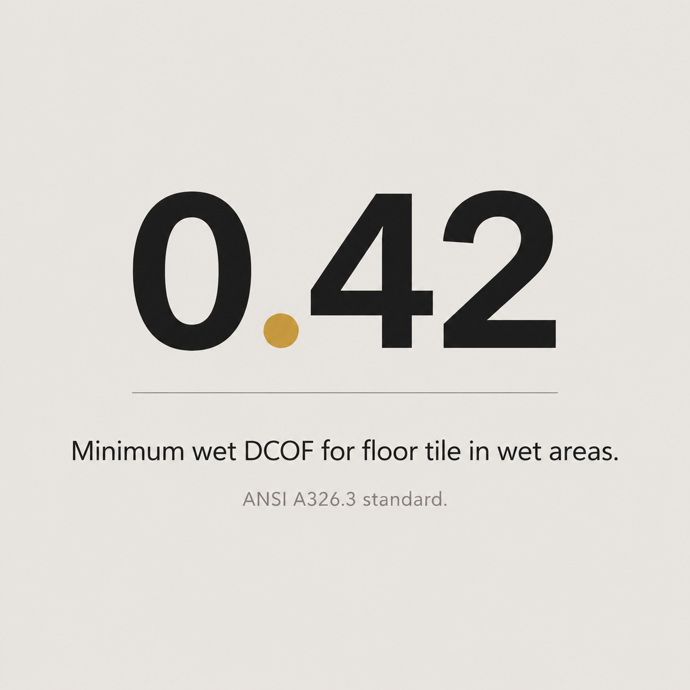
Slip resistance matters when you are matching a floor tile for a wet area like a shower or bathroom floor. Under the ANSI A326.3 standard, hard flooring meant to be walked on when wet should have a wet slip-resistance rating, measured as dynamic coefficient of friction, of at least 0.42. Some home-repair articles print this as 0.042, which is a decimal error that would describe a dangerously slick surface. When you source a replacement floor tile for a wet area, look for the true 0.42 threshold.
Tools and materials you'll need
Gather everything before you start so you are not hunting for a tool mid-job.
Tools
● Safety glasses, work gloves, and a dust mask or respirator rated for fine dust
● Oscillating multi-tool with a diamond or carbide blade, or a handheld grout saw, for clearing the grout joint
● Cold chisel (a narrow one and a wider flat one) and a hammer
● A carbide or diamond core bit and a drill, for relief holes
● Margin trowel and a notched trowel sized to the tile
● Tile spacers, a level or short straightedge, and a rubber grout float
● A wood block for tapping the tile flush, plus sponges and clean rags
● A shop vacuum, ideally with a HEPA filter, for dust and debris
Materials
● A matching replacement tile
● Polymer-modified thinset mortar suited to your tile and location
● Grout that matches the existing joints
● Grout or stone sealer, if your grout or tile needs it
● Painter's tape to protect the surrounding tiles
You can pick up setting materials at the pro counter in most of our showrooms, or shop thinset and mortar and tiling tools online.
How to remove a cracked tile without damaging the others
Grout ties the whole installation together into one rigid surface. If you start prying or chiseling while the grout around the broken tile is still intact, the force travels straight into the edges of the neighboring tiles and chips them. So the order of operations matters.
1. Clear the grout around the tile first. Run an oscillating multi-tool or a grout saw around all four sides of the damaged tile, cutting the grout all the way down to the surface underneath. This frees the tile from its neighbors and gives the broken pieces somewhere to move.
2. Protect the surrounding tiles. Lay painter's tape along the edges of the adjacent tiles. If the neighbors are glossy porcelain, delicate ceramic, or polished stone, tape a thin strip of hardboard or metal over those edges to absorb any stray tool contact.
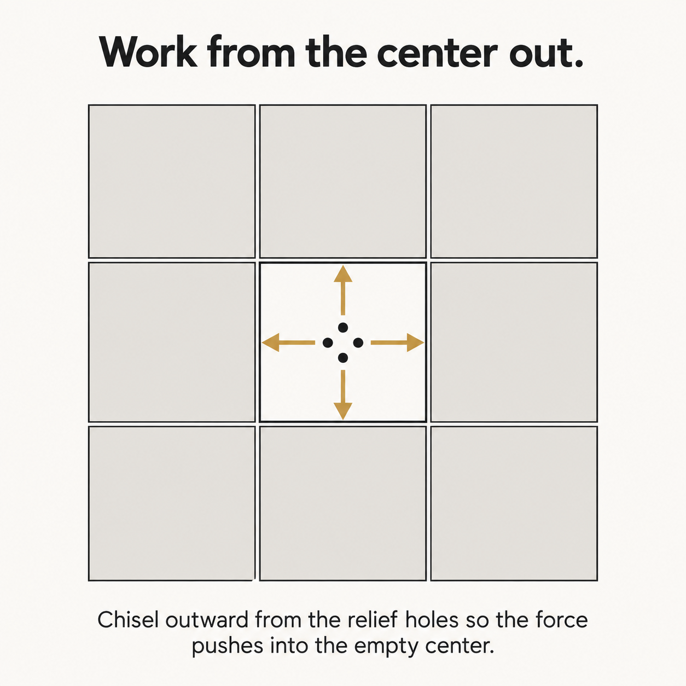
3. Break the tile from the center out, not the edges in. Drill three to five relief holes through the middle of the tile with a core bit, keeping the bit wet to control heat and dust. Seat a narrow chisel in one of the center holes and tap it to crack the middle. Then angle the chisel and work outward from that opening toward the cleared grout line, so the impact pushes into the empty center rather than against the sound tiles around it. Keep the beveled face of the chisel pointed toward the center cavity.
Two removal methods come up most often. Here is how they compare.
Hammer and chisel | Angle grinder | |
Speed | Slower, more controlled | Fast |
Control near neighbors | High, if you work center-out | Low, the blade can wander and score adjacent tiles |
Dust | Coarse debris, easier to contain | Throws large amounts of fine silica dust |
Best for | Most single-tile jobs indoors | Rarely recommended indoors for one tile |
For a single tile in a finished room, the hammer-and-chisel approach, paired with an oscillating tool for the grout, gives you the most control and the least risk to the surrounding tiles. An angle grinder cuts quickly, but the spinning blade is easy to slip into a neighboring tile, and it produces a lot of fine dust.
Take the dust seriously. Cutting and grinding tile and mortar releases respirable crystalline silica, which is a genuine health hazard. Keep the cut wet where you can, use a vacuum with a HEPA filter, wear a proper respirator, and follow the OSHA guidance on silica dust control. Eye protection and gloves are non-negotiable for the whole job.
How to prep the area for the new tile
Once the old tile is out, turn your attention to the surface underneath. The new tile can only sit as flat as the base you set it on.
Chisel or scrape the old thinset off the exposed cavity until you are back to a flat, sound base, whether that is the concrete slab or a cement backer board. Leftover ridges of hardened mortar will hold the new tile too high, so it sits above the rest of the floor. Take the high spots down without gouging the base. Vacuum out every bit of dust and grit, since fresh mortar will not bond well over a dusty surface. Skip liquid adhesive removers and solvents on concrete or backer board, because the residue can soak in and stop your new mortar from sticking.
Then dry-fit the tile. Set it in the empty pocket without any mortar and check that it sits flush with or just slightly below the tiles around it, leaving a little room for the mortar bed. Confirm the grout gaps line up on all four sides using spacers that match your existing joint width. If the dry tile sits too high, take a little more mortar off the base before you go further.
How to set the replacement tile
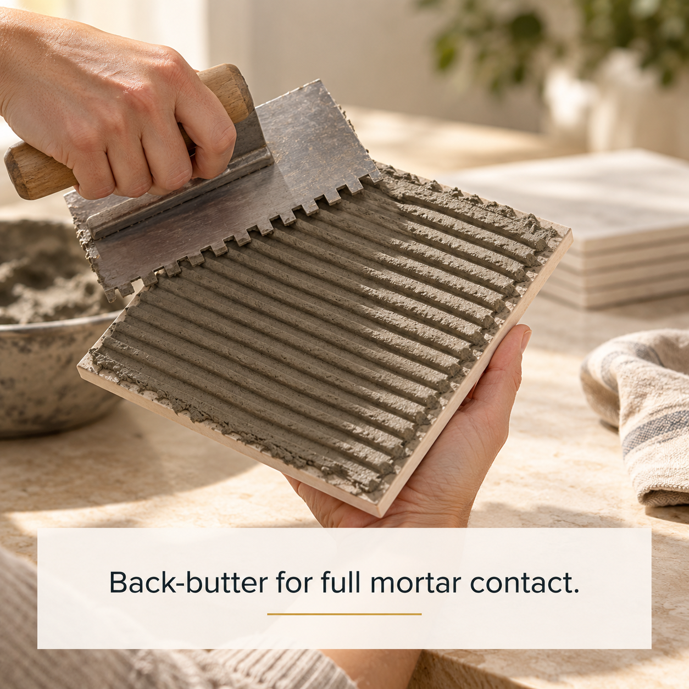
Use a polymer-modified thinset mortar. For an occupied home where you cannot block off the area for a full day, a rapid-setting version lets you grout and walk on the repair sooner. Avoid pre-mixed organic adhesives and mastics for floors and any wet area, since they stay soft under dense tile and can re-soften when they get wet.
The reliable way to set one tile is to back-butter it, which just means spreading mortar directly onto the back of the tile rather than only on the floor.
● Wipe the back of the tile clean.
● Key a thin, firm coat of mortar into the back with the flat side of the trowel, pressing it into the surface.
● Comb a fuller layer over that with the notched edge, in straight parallel ridges.
● Spread a thin skim of mortar across the prepped cavity too.
Press the tile into place and slide it back and forth across the ridges to flatten them and squeeze out trapped air. The goal is full, even contact across the whole back of the tile with no gaps, which matters most in wet areas and with natural stone. Set your spacers, lay a wood block across the new tile and its neighbors, and tap gently until the new tile is flush with the surrounding tiles. Clean any mortar that squeezes up into the joints before it hardens, leaving the joints open for grout.
Let the mortar cure before you grout. Follow the cure time on the product, which is typically around a day for a standard thinset and less for a rapid-set formula. Grouting too soon breaks the bond while it is still setting.
How to grout and seal the new tile
Match the grout to your existing joints. Grout color shifts as it dries and can vary by brand, so if you are unsure, test a small amount and let it dry fully before committing.
Work the grout diagonally across the joints with a rubber float, packing them completely. Let it reach its initial set, then wipe the surface with a firmly wrung-out damp sponge to shape the joints and lift the excess. Once it dries, a light haze usually remains, which buffs off with a dry microfiber cloth. Give the grout its full cure time before exposing it to heavy water or foot traffic.
Sealing depends on your materials. Most cement-based grout benefits from a penetrating sealer once it has fully cured, which helps it resist stains and moisture. Natural stone tile, and sometimes the grout around it, should also be sealed. Porcelain and glazed ceramic tile do not need sealing themselves, though the grout lines still might. Our installation, maintenance, and care hub covers sealing and long-term upkeep, and if you want the joint looking new afterward, our guide to cleaning tile floors and grout is a useful follow-up.
When replacing one tile isn't the real fix
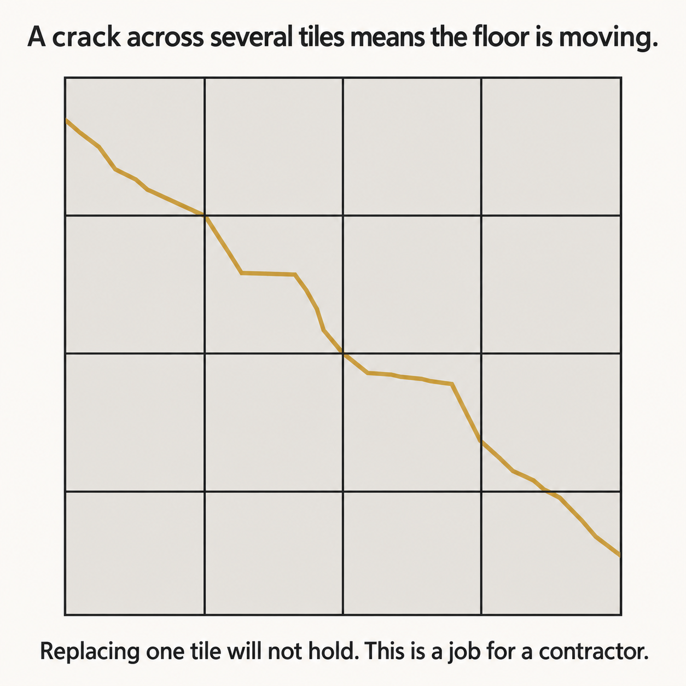
Sometimes a cracked tile points to a bigger problem underneath. A few signs suggest the surface beneath the tile is moving, rather than the crack coming from a one-off impact:
● The same tile, or the same spot, cracks again after you replace it.
● A crack runs in a straight or stepped line across several tiles and their grout joints.
● The floor flexes, bounces, or feels springy when you walk across it.
● Grout lines are crumbling to powder along a continuous run.
These usually mean the subfloor or slab beneath the tile is moving or flexing more than a rigid tile surface can tolerate. Tile has very little give, so when the base moves, the tile takes the stress and cracks along the same line every time. Swapping in a new tile over a moving base will just crack the new one.
The real fix is bigger than one tile. It might mean stiffening a subfloor that flexes too much, installing a flexible crack isolation membrane that absorbs small movements in the surface below, or, in the case of a shifting slab, structural work. The industry sets minimum floor-stiffness standards for tile, and natural stone requires an even stiffer floor than ceramic or porcelain. If you want to understand what a tile floor needs underneath it, this overview of tile floor structure is a good starting point.
This is the point to bring in a professional. Because we supply tile and materials but do not install, our showroom teams can connect you with a local trusted contractor who can diagnose the movement and do the underlying repair correctly, so your new tile stays put.
Where to find matching tile and materials
The best repair starts with the right tile and the right materials. Bring a clean piece of your broken tile to your nearest Bedrosians showroom and our specialists will help you match it or plan a deliberate accent, and you can pick up thinset, grout, sealers, and tools at the pro counter while you are there. Prefer to shop from home? Order $1 samples to confirm your match first, or call us at (559) 275-5000 and we will point you to the closest showroom for your project. And if the crack turns out to be a sign of something bigger under the surface, we will connect you with a local contractor who can handle it.

