How to Plan a Tile Layout Before You Set a Single Tile
September 12, 2026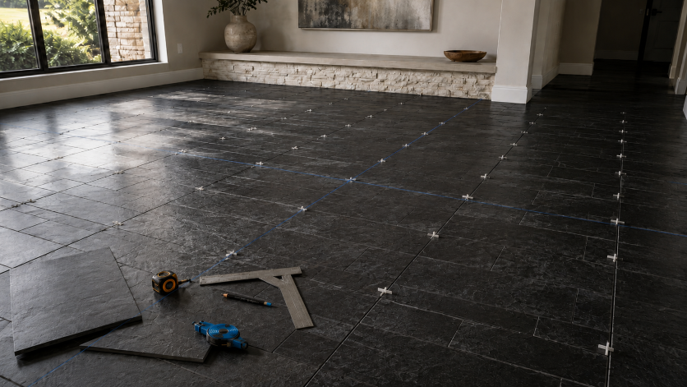
Planning a tile layout means deciding exactly where every tile will land before you spread any mortar. The process is the same for most floors and walls. You measure the room in several places, snap two square reference lines to find the center, dry-lay tile with spacers to preview the real cuts, shift the grid so no edge piece ends up a thin sliver, and pick a pattern and tile size that suit the room and the substrate underneath (the floor or wall surface the tile sits on). All of it happens with a tape measure, a set of samples, and a chalk line, before a single tile is set.
At Bedrosians Tile & Stone, we've spent 78 years helping homeowners, designers, and contractors plan tile projects, and the layout stage is where most of that help happens. Our showroom specialists routinely walk customers through formats, finishes, grout, layout, and quantity before anything is ordered.
Why planning your tile layout matters before you set any tile
A good layout is the difference between a floor that looks intentionally designed and one with crooked lines and thin slivers at the walls. The tile itself can be beautiful, but if the grid is off, the first thing anyone notices is the awkward cut at a doorway or the row of tapering pieces along a wall.
Planning ahead solves four problems at once:
● Prevents awkward cuts and thin slivers at walls, doorways, and transitions.
● Keeps grout lines straight and square instead of drifting as they cross the room.
● Reduces wasted tile by showing you the real cuts before you buy.
● Gives you a result that looks professional rather than improvised.
What to gather before you plan your layout
Get these five things settled first. Each one changes how the tile lands in the room.
● Final room dimensions. Measure the actual space, not the numbers on an old plan.
● Chosen tile size. A 12x24 tile lays out very differently from a 2-inch mosaic.
● Grout joint width. The gap between tiles adds up across a room and affects where cuts fall. If you have not settled on a joint width yet, our guide to choosing grout covers how width and color change the finished look.
● Chosen pattern. Straight, offset, diagonal, or herringbone all need different planning.
● How much tile to buy. Order 10 to 15 percent extra for cuts, waste, and future repairs. Add more for diagonal or complex patterns like herringbone, which produce more off-cuts.
Keep those spares from the original batch even if you never use them. Tile from a later order can come from a different production run and vary slightly in color, so having extras from the first batch protects you if a tile ever cracks.
How to measure your room accurately
Rooms are rarely truly square, so one measurement is not enough.
Measure the length in at least three spots, then measure the width in at least three spots.
Write down every reading.
Plan your layout from the smallest reading, so the tile fits the tightest part of the room.
Check the floor or wall for flatness and level with a long straightedge.
Do not skip the flatness check. Dips and high spots cause lippage, which is when one tile sits higher than the next so its edge sticks up. On floors, dips also crack grout later. Lay a 10-foot straightedge across the surface and look for gaps underneath before you commit to a large tile.
How to find the center and snap reference lines
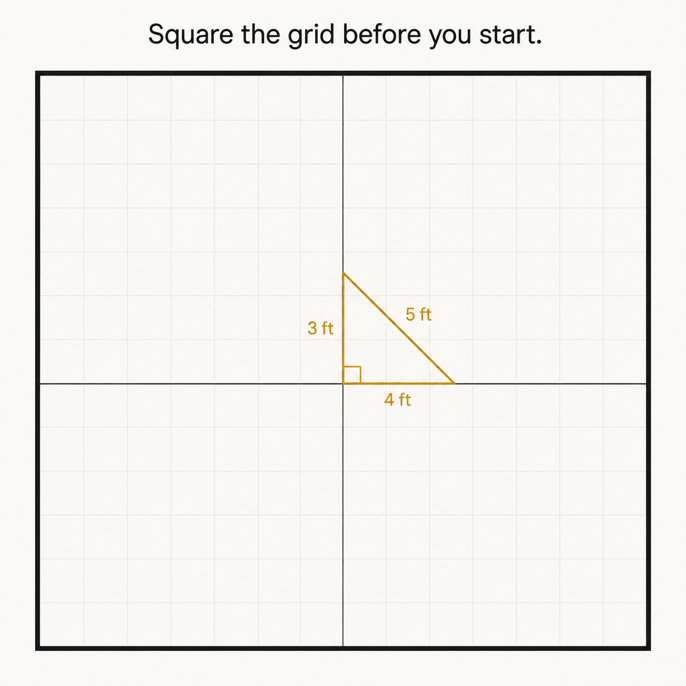
Most floor layouts start from the center of the room so the cuts at all four walls stay balanced.
Find the midpoint of each wall and mark it.
Snap a chalk line between the midpoints of the two opposing walls.
Snap a second chalk line between the other two midpoints, so the two lines cross near the center.
Make the two lines meet at a true right angle.
Squaring those lines is the step that keeps the whole grid straight. Use a framing square where the lines cross, or use the 3-4-5 method. Measure 3 feet along one line, 4 feet along the other, and adjust until the diagonal between those two points measures exactly 5 feet. Those crossed, squared lines divide the floor into four quadrants, and you build the layout outward from the center into each one.
Before you snap anything, dry-lay a short run of a few tiles plus their grout joints until the run reaches about 24 to 36 inches, and use that as your working unit. It tells you how the tile and grout actually measure together, which is often a little different from the tile size on the box.
Should you start your tile layout at the center or a focal wall?
Center-start is the standard because it balances the cut tiles on opposite walls. It is the safest default for a plain rectangular room.
A different starting point can look better in specific situations:
● Long, narrow rooms, where centering can leave odd cuts at both ends.
● Feature-driven rooms, where one wall or fixture is clearly the focal point.
● Rooms with a strong sightline, like the view straight through a doorway.
In those cases, start the grid from the dominant wall or the focal point so the most visible tilework lands on full tiles. The rule of thumb still holds. Adjust the grid so no edge piece is smaller than half a tile.
To test whether an off-center layout will bother you, stand where people enter the room and find the spot you look at first, whether that is a tub, a vanity, a range, or the far wall. If an off-center grid would put a thin sliver or an obviously lopsided cut in that exact spot, choose a starting point that puts full tiles there instead.
How to do a dry layout

A dry layout is laying the tile out with spacers and no adhesive, so you can see the finished pattern before you commit.
Set tile along both reference lines, working out from the center.
Put spacers between the tiles so the grout joints match the real spacing.
Walk the room and look at where the cuts fall at every wall, doorway, and transition.
Check that the pattern looks the way you expected at full scale.
Problems are still free to fix at this stage, and a pattern that looked fine on a sample board can reveal an awkward cut line or a busy corner once it covers the floor.
How to balance edge cuts and avoid thin slivers
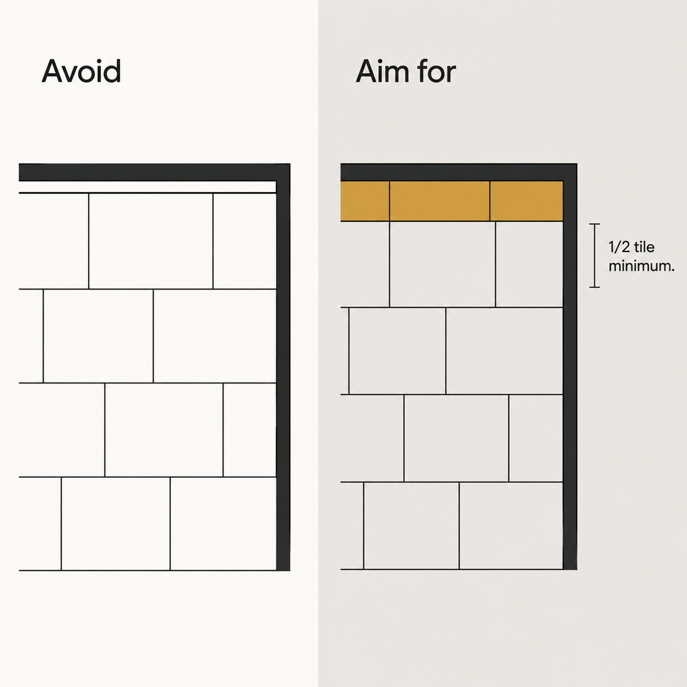
The goal is to keep the cut tiles at the edges wide enough to look deliberate. Anything narrower than about half a tile looks like a mistake.
During the dry layout, check the cut width at each wall.
If a cut on one side would be a thin sliver, shift the whole layout by half a tile.
Re-check the opposite wall, since moving the grid trades width from one side to the other.
Aim for edge pieces that are at least half a tile wide on the walls people notice most.
When tile runs continuously through a doorway into a hall or an adjoining room, plan so the grout lines carry across the threshold. Balancing the cuts perfectly for one room can throw off the alignment where the tile continues, so pick the reference that keeps the whole run consistent.
How to choose a tile pattern (and how it changes your layout)
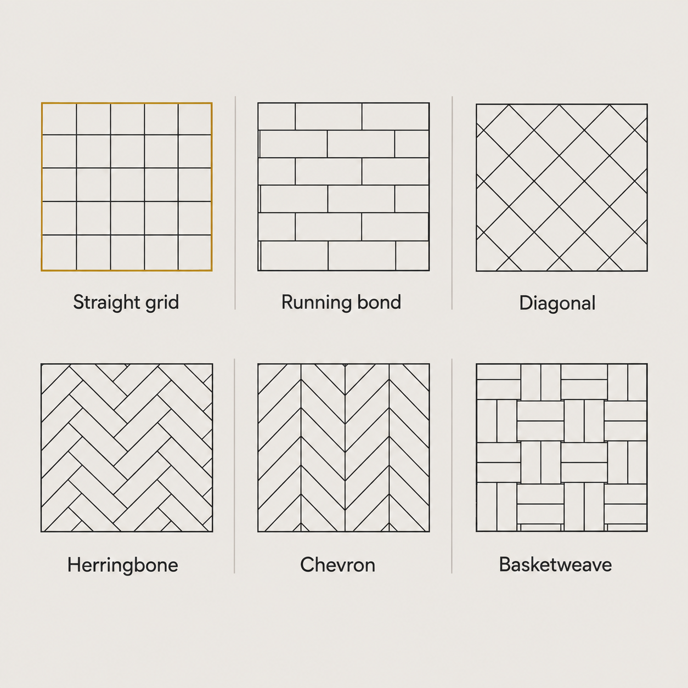
The pattern you pick affects how hard the tile is to lay and how much extra you should buy. Busier patterns need more planning and more overage.
● Straight grid. Tiles aligned in rows both directions. The most forgiving pattern and the easiest to plan.
● Running bond (offset). Each row shifted so the joints do not line up, like a brick wall. Simple to plan, with slightly more cutting than a straight grid. This is the classic layout for subway tile.
● Diagonal. The grid turned 45 degrees. It needs extra reference lines and produces a triangular off-cut at every wall, so plan for more waste.
● Herringbone. Rectangular tiles set in an interlocking zigzag. A detailed look, and cut-heavy since most tiles are cut at an angle.
● Chevron. Tiles cut to a point so the rows form continuous Vs. Similar planning demands to herringbone.
● Basketweave and Versailles. Patterns that mix shapes or sizes. They require careful dry-laying to keep the grout lines aligned and tend to waste the most tile.
The table below gives general planning estimates. These are rules of thumb, not fixed standards, and your actual waste depends on the size and shape of the room.
Pattern | Cutting difficulty | Extra tile to order |
Straight grid | Low | About 10% |
Running bond (offset) | Low to moderate | About 10% |
Diagonal (45 degrees) | Moderate | About 15% |
Herringbone | High | 15 to 20% |
Chevron | High | 15 to 20% |
Basketweave or Versailles | High | 20% or more |
When the side being offset is longer than 15 inches, ANSI A108.02 caps the offset at about one-third of the tile length unless the tile manufacturer specifies otherwise. A bigger offset, like a half-tile brick pattern, lines up the high edge of one long tile with the low edge of the next, which is how lippage happens on large-format floors. Keeping the offset to a third is the simplest way to avoid it.
How tile size and direction change your layout
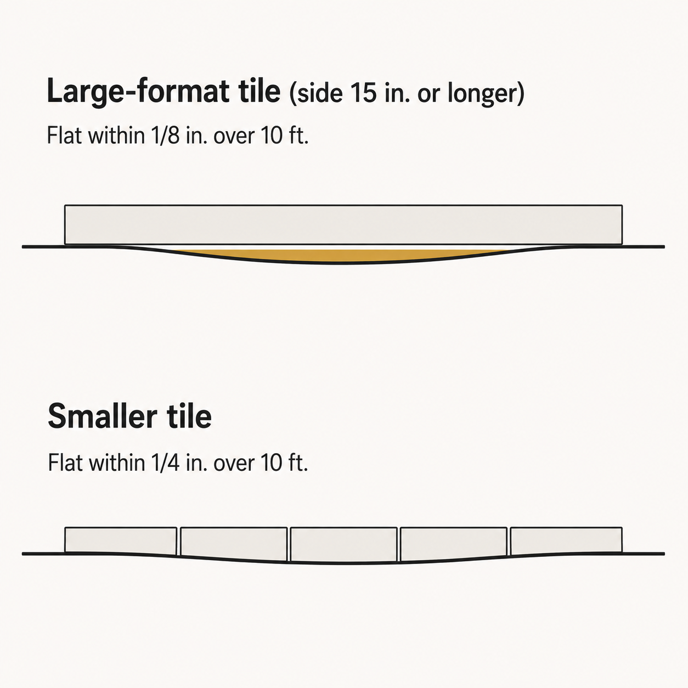
Large-format tile gives you fewer grout lines and a cleaner look. The catch is that it needs a very flat substrate, because a big rigid tile cannot follow a dip in the floor. Once a tile has at least one side 15 inches or longer, ANSI A108.02 tightens the flatness requirement to within 1/8 inch over 10 feet, against 1/4 inch over 10 feet for smaller tile. If the floor is not that flat, plan to level it first.
Small tiles and mosaics are more forgiving of an uneven substrate, but they expose an out-of-square room. A large tile spreads that discrepancy across fewer grout lines, so it is harder to see. A small mosaic next to the same wall will show a visible taper in the grout line. If your walls are noticeably out of square, keep that in mind when choosing tile size.
The direction you run the tile matters too. Running rectangular tile so its long dimension is parallel to the longest wall tends to make a narrow room feel wider. Running it the other way draws attention to a feature at the end of the room. This is a common design approach rather than a fixed rule, so use the dry layout and the Bedrosians Room Visualizer to see which looks better in your space.
How planning differs for walls, backsplashes, showers, and natural stone
The core process carries over, but a few surfaces need their own steps.
Walls and backsplashes
Use a plumb vertical reference line rather than working off the countertop. Counters are often slightly out of level, and lining tile up to an unlevel counter tilts the whole wall. Dry-lay the tile on a board or a length of plywood first to check the cut heights and the pattern before anything goes on the wall. Walls rarely need expansion joints except at large spans or where materials change. For a full walkthrough of the setting stage, see our step-by-step guide to installing backsplash tile, and browse backsplash tile to compare formats.
Showers and wet floors
A shower floor has to slope toward the drain, usually about 1/4 inch per foot, which is why small mosaic tile works best there. Small tiles flex to follow the slope in every direction. Large tiles cannot, so using them on a shower floor usually means installing a linear drain that slopes in only one direction. Plan for a waterproofing membrane and for flexible sealant, not grout, where the floor meets the walls. If slip resistance matters for a wet area, look for a dynamic coefficient of friction (DCOF) of at least 0.42 under ANSI A326.3, which is the current standard for level interior floors that get wet. Our guide to understanding DCOF explains how to read the number on a spec sheet.
Natural stone
Natural stone tile is heavier and varies piece to piece, so dry-lay it by eye and arrange the tiles so the veining and color flow the way you want before you set anything. Start from the visual center or the focal point and shuffle pieces until the grain looks consistent from tile to tile. Stone also needs a stiffer, flatter subfloor than porcelain or ceramic, so confirm the substrate can carry it without flexing.
On any floor, plan for movement joints so the tile can expand and contract without cracking. The Tile Council of North America treats expansion and contraction as something every installation has to account for. In a small room, a gap around the perimeter hidden behind baseboard usually covers it. Larger areas need joints out in the field of the floor, where they will be visible.
Common tile layout mistakes to avoid
Most layout problems trace back to a handful of skipped steps:
● Thin slivers at doorways and walls. The clearest sign of a rushed layout. Shift the grid by half a tile to fix it.
● Skipping the flatness and square check. Dips cause lippage and cracked grout, and an out-of-square room ruins small-tile grout lines.
● Too much offset on large tile. Going past about one-third offset on tiles 15 inches or longer invites lippage.
● No dry layout. Setting tile straight into mortar hides pattern and cut problems until they are permanent.
● Ignoring the focal point. A balanced grid still looks wrong if an awkward cut lands in the spot people look at first.
● Not enough overage. Running short mid-project means a second order that may not match, so buy the extra up front.
Where to go next when you're ready to plan your layout
The best layout starts with the tile in your hands. Order $1 samples, or 5 free with the code SHIPFREE5 and free shipping on your first sample order, so you can dry-lay real tile and check the cuts, pattern, and color in your own lighting before you commit. To preview a specific tile and pattern in your actual room, use the Bedrosians Room Visualizer, which lets you see the layout on your own floor or wall.
When you know the tile, format, and pattern, our showroom specialists can help you work out the quantity and the overage for your space. With 44 showrooms across 11 states, there is likely one near you where you can compare tile in person. You can also order tile samples online, browse our tile by look collections if you want to see patterns and formats side by side, or start with a few remodeling basics if this is your first project.
Bedrosians supplies tile, samples, and planning help, and we do not install. When you are ready to set the tile, we can point you to local trusted contractors through your nearest showroom, and our pro counters stock the setting materials the job will need. Call us at (559) 275-5000 to get connected with the right showroom for your project.
Frequently asked questions
Do you start tiling from the center or the wall?
Most floors are laid from the center so the cut tiles at all four walls stay balanced. Starting from a dominant wall or focal point can look better in long, narrow, or feature-driven rooms, as long as no edge piece is smaller than half a tile.
How much extra tile should I buy for a layout?
Order about 10 to 15 percent extra for cuts, waste, and future repairs. Add more for diagonal or complex patterns like herringbone, which produce more off-cuts, and keep the spares from the original batch in case a tile ever needs replacing.
Why do I need to dry-lay tile before setting it?
A dry layout with spacers and no adhesive shows you the real cuts and the full-scale pattern while everything is still free to change. It is the easiest way to catch a thin sliver or an awkward cut line before the mortar makes it permanent.

