Large Format Porcelain Slab Shower Walls: A Complete Guide
October 16, 2026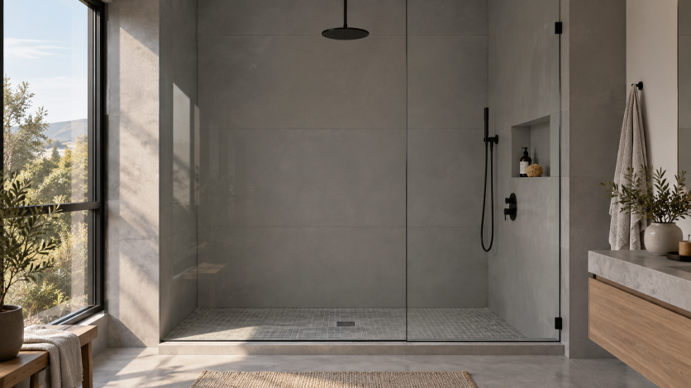
Large format porcelain slab shower walls are single sheets of porcelain big enough to cover most of a shower wall in one piece, which removes nearly every grout line from the enclosure. The industry term is gauged porcelain tile panel, and under the ANSI A137.3 standard it means any porcelain unit with a face of at least one square meter, or about 10.76 square feet. Panels made for walls commonly run up to 5 feet by 10 feet. They give a shower the look of a solid stone wall, and unlike marble or travertine they never need sealing. They also cost more to install than tile, because the wall behind them has to be almost perfectly flat and the panels take a trained crew to move and set.
We have been supplying tile and stone at Bedrosians Tile & Stone for 78 years, and slabs sit alongside tile in all 44 of our showrooms across 11 states. Our Magnifica porcelain slab line is made in large formats up to 120x60, in 6mm, 12mm, and 2cm thicknesses, and Magnifica Fusion is our 6mm panel cut to shower sizes before it ships. The colors run from marble looks to stone looks, at a price a normal remodel can absorb. We supply the slab, the mortar, and the waterproofing. Your installer sets it, and how well they do that matters more here than on any tile job.
The prices in this guide are general market estimates. Actual costs vary by region, material and finish, site conditions, and project size. Use these ranges to plan a budget, then get a local quote for numbers specific to your project.
What is a large format porcelain slab?
A porcelain slab is porcelain made in one very large, very flat sheet instead of individual tiles. Manufacturers press refined clay and natural minerals under extreme pressure without a die mold, then fire the sheet in a controlled kiln at more than 2,200 degrees Fahrenheit. That firing removes internal tension in the ceramic body, which is what allows a piece that size to come out flat and stay flat.
The firing also vitrifies the material, which means the clay body fuses to a glass-like density. Finished panels absorb less than 0.5 percent water, and many test well under 0.1 percent, which puts them in the impervious category. Water does not soak into the face of the slab, so the surface itself cannot hold mold or stain from the inside. ANSI A137.3 and A108.19, published by the Tile Council of North America, are the standards that define the material and its installation.
You will see the same product called a slab, a panel, or gauged porcelain. They all refer to the same thing. Large format tile is a different thing, because it is still tile, set in a grid with grout joints between the pieces.
Porcelain slab vs. large format tile
People mix these two up constantly, and the difference changes the budget, the installer you hire, and how the finished shower looks. Large format tile is any tile with one edge longer than 15 inches. It is a modular system, so the grout joints give the installer room to absorb small variations in the wall. A slab has no joints to work with.
Porcelain slab | Large format tile | |
Piece size | Up to about 5 feet by 10 feet | Commonly 12x24 up to 24x48 |
Grout in the field | Almost none, only movement joints at corners and edges | A full grid of joints |
Wall flatness required | Near perfect, within 1/8 inch over 10 feet | More forgiving, joints absorb variation |
Who can install it | Trained crew of 3 or 4 with suction frames | One setter and a helper |
Repairing damage | Replace the whole panel | Cut out and replace one tile |
Installed cost | Higher, driven by labor | Lower |
If you are weighing tile for the same shower, our guide to large format tile for showers covers that side of the decision, and best porcelain tile for showers breaks it down by wall, floor, and niche.
Why homeowners pick slab shower walls
The grout is the main reason. In a tiled shower, cement grout is the porous part of the assembly, and it is where mildew, staining, and efflorescence (the white mineral haze that seeps through grout) show up first. Cladding a wall in one panel leaves only the movement joints at the corners and the perimeter, so there is far less porous surface in the wettest room of the house.
Without a grid of lines breaking up the wall, a small shower looks bigger and more open. High resolution digital printing applied before firing puts realistic veining on the surface, and two heavily veined panels can be bookmatched, meaning they are set side by side in a mirrored layout so the veining runs across the seam. That is the look people mean by a seamless stone shower, and it used to take real stone at several times the price.
Porcelain is also easier to live with than natural stone. Marble and travertine have to be sealed on a schedule to keep water, acidic cleaners, and hard water deposits from etching and discoloring them. Porcelain is chemically inert and never needs sealing. It holds no organic resins either, so sunlight through a bathroom window will not yellow or dull it over time. If you are still choosing between the real thing and the look, we compared them in marble vs. marble-look porcelain, and our marble tile range is worth seeing in person next to a slab.
Finish affects upkeep as much as looks. Polished panels bounce light around and make a small shower brighter. Honed and matte panels hide water spots better, which matters in a bathroom that gets daily use. There are also textured panels printed to look like concrete or wood grain if stone is not the direction you want.
What thickness works for shower walls

ANSI A137.3 sorts gauged porcelain by thickness, and the tables tell you what each one is rated to do. Products from 3.5mm to 4.9mm are rated for walls and countertops. Products from 5.0mm to 6.5mm are rated for floors, walls, and countertops. Products at 20mm and thicker are the heavy end, built for load-bearing and commercial work. For a shower wall, installers generally reach for something around 6mm, which is light enough to handle safely and stiff enough to survive cutting.
A 6mm panel runs roughly 3 to 4 pounds per square foot, light enough that a full wall of it does not need extra framing. A thicker slab adds weight, cost, and fabrication time without making the finished wall look any better, which is why the heavy profiles stay on countertops.
Our Magnifica porcelain slab line covers that range. The 6mm panel comes in formats up to 120x60, and Magnifica Fusion is the same 6mm porcelain cut to shower sizes before it ships, which takes some of the fabrication risk out of the job. The 12mm and 2cm slabs are the countertop weights, and if you are also speccing a vanity top or a kitchen counter, we compare those two in how to choose the best porcelain slab thickness.
Porcelain slab vs. engineered quartz for shower walls
Engineered quartz comes up in the same searches because it also produces a groutless wall. It is a composite, roughly 90 to 95 percent crushed quartz held together by 5 to 10 percent polymer resin and pigment. That resin is the reason the two materials behave differently once they are in a shower.
Porcelain slab | Engineered quartz | |
What it is | Fired ceramic, no resin | Crushed quartz bound in polymer resin |
Heat and steam | Very low thermal expansion, dimensionally stable | Resins expand and contract more, can scorch or warp |
Sunlight | UV stable, holds color indefinitely | Resins can yellow or dull with prolonged UV exposure |
Weight on the wall | About 3 to 4 pounds per square foot at 6mm | About 20 to 25 pounds per square foot at 3cm |
Framing | Works over approved standard framing | Often needs added structural blocking |
We no longer sell engineered quartz. Our engineered slab option is Nouvel, a mineral surface made with ultra-low crystalline silica, and we position it for countertops and vanities rather than shower walls. For a wet enclosure, porcelain is the material we point people toward.
What a correct installation involves
Most of a slab shower budget goes to labor rather than material, and bad labor is what makes these showers fail. The governing standard is ANSI A108.19, which covers interior installation of gauged porcelain panels. Slab work is a separate discipline from bathroom tiling, with different mortars, different tools, and different tolerances.
The wall behind the slab has to be flat
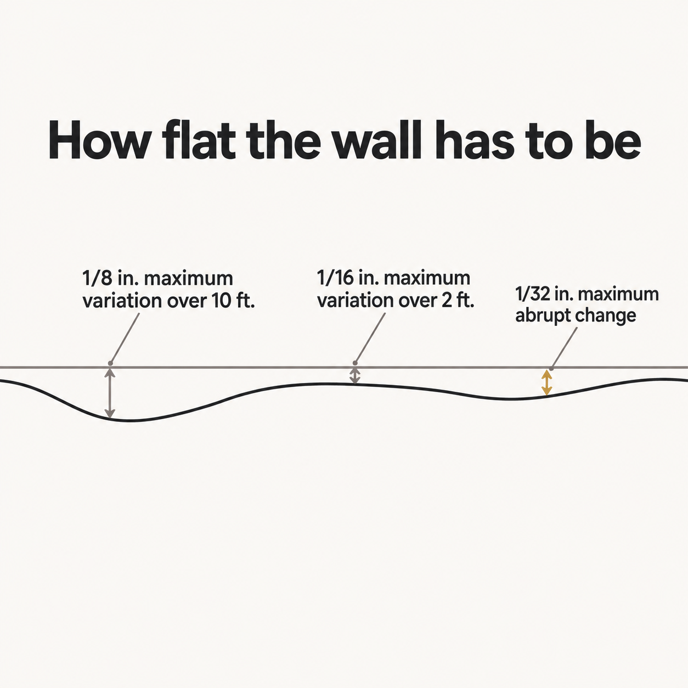
A bonded panel has essentially no flex. The tolerance installers work to comes from TCNA's surface-flatness guidance for large format tile: no more than 1/8 inch of variation across 10 feet, no more than 1/16 inch across any 2 feet, and no abrupt irregularity over 1/32 inch. Custom Building Products, one of our setting-material partners, publishes the technical bulletin most installers keep on hand for this work. Forcing a rigid panel over a bowed or out-of-plumb wall builds tension into the ceramic, and that tension shows up as a stress fracture either during installation or months later. Plain drywall or unshimmed backer board usually will not hold that tolerance on its own, so expect shimming, rendering mortar, or a trowel-applied leveling compound, plus the days of labor that come with it.
Waterproofing goes on first
The substrate needs a bonded, load-bearing waterproof membrane meeting ANSI A118.10, either liquid-applied in coats or a sheet membrane adhered to the wall. That membrane protects the framing, and once the slab is bonded over it nobody is going back to fix it. We stock shower systems and waterproofing at our pro counters for exactly this stage.
How much mortar coverage a slab needs
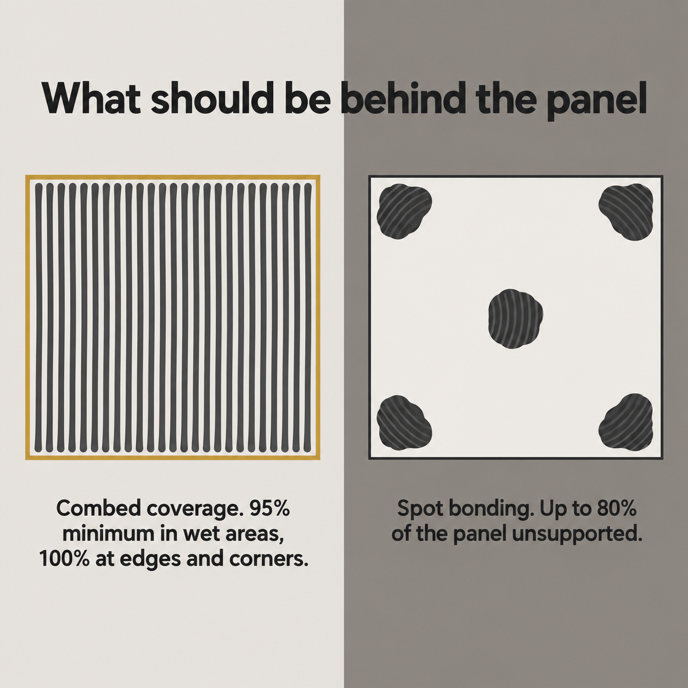
Standard unmodified thin-set is not rated for this work. Panels call for an improved modified dry-set mortar meeting ANSI A118.15, formulated for large and heavy tile with the open time and the non-sag behavior a vertical panel needs. The installer applies mortar to the wall and to the full back of the panel, a step called back-buttering. Both surfaces get combed in straight lines running parallel to each other, so trapped air has a path out. Once the panel is against the wall it gets embedded with vibration, usually an orbital sander with a padded bonnet worked from the center outward. Coverage requirements step up with how wet the area is. Dry interior walls call for at least 80 percent, and wet areas like a shower call for at least 95 percent continuous coverage behind the panel, with no void larger than two square inches and 100 percent support at the edges and corners. Our pro counters carry the tile setting materials these installations call for.
Why spot bonding fails
Spot bonding, also called five-spotting or dot-and-dab, is when an installer puts blobs of mortar at the corners and center of a panel instead of combing the whole back. It is fast, it lets a crew plumb a big panel over an uneven wall, and the Ceramic Tile Education Foundation and the National Tile Contractors Association both say it guarantees failure.
The thick blobs cure unevenly, shrink, and curl, which tears their own bond off the substrate. The voids between them trap steam and condensation, which is where mold and efflorescence grow unseen. And with 70 to 80 percent of the panel unsupported, a point load as ordinary as leaning on the wall or hanging a fixture can shatter brittle porcelain inward. Spot bonding violates ANSI standards and voids manufacturer warranties, so ask directly how the back of the panel will be covered before you sign a bid.
Why shower corners get silicone instead of grout
A shower cycles between cold air and hot steam all day, and the assembly moves with it. TCNA method EJ171 requires that every perimeter joint, every change of plane, and every abutment to a different material stay free of rigid setting material. Those gaps take a flexible 100 percent silicone sealant meeting ASTM C920, usually over a foam backer rod. Rigid grout in a corner will crack and let water behind the system, and acrylic painter's caulk shrinks and turns brittle in a shower. The International Masonry Institute publishes the detail drawings for these joints. On the panel faces themselves, ANSI A108.19 holds lippage, the height difference between two panels sitting side by side, to 1/32 inch. Installers hit that using mechanical clip-and-wedge systems that hold the edges flush while the mortar cures.
Getting the panels into the room
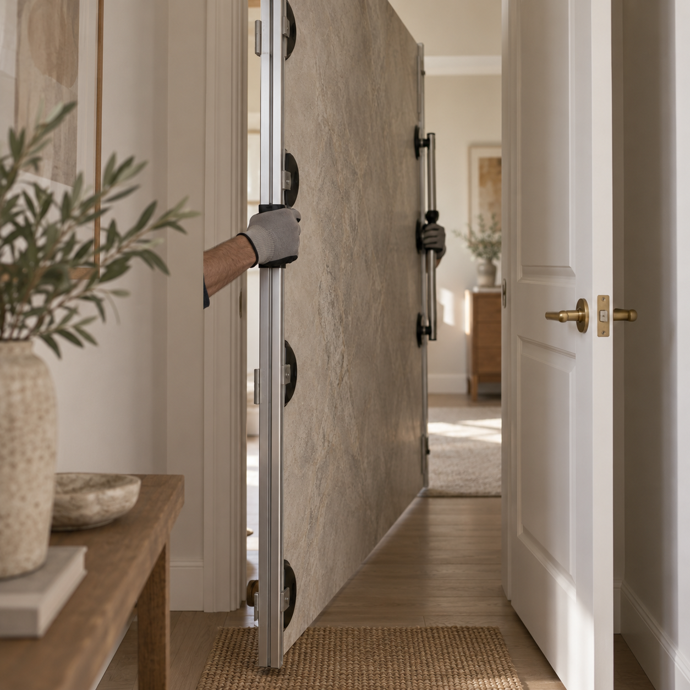
Before it is bonded, a 6mm panel is flexible and brittle at the same time. Carried flat, it will snap under its own weight. Panels ship on oversized A-frames and move through the house on multi-point vacuum suction frames that act as a temporary exoskeleton, handled by a crew of two to four. Measure the path before you order. The crew has to get a rigid 10-foot frame up your staircase, around your hallway corner, and through your bathroom door. Access is the most common reason a home cannot take slabs.
Panels need an extended wet saw with a continuous-rim diamond blade, or a full-length scoring track. For plumbing cutouts, the installer drills the four corners with a diamond core bit first to round them, then connects the holes with straight cuts. Plunging straight into a 90-degree corner concentrates stress in a brittle material and sends a crack running across the panel.
How to vet an installer
Ask whether they hold an Advanced Certification for Tile Installers in gauged porcelain tile and panels. The ACT program was built by six tile industry organizations, including the Ceramic Tile Education Foundation, the National Tile Contractors Association, the International Masonry Institute, and the Tile Council of North America. Gauged porcelain tile and panels is one of its certification areas. Earning it takes a written test on the applicable ANSI specifications and TCNA methods, plus a hands-on field test judged by trained third-party evaluators.
Three questions worth asking any bidder:
How will you achieve mortar coverage on the back of the panel, and what percentage are you targeting?
What will you do to bring the substrate into flatness tolerance, and is that included in the bid?
What silicone and backer rod are you using in the corners and at the floor transition?
We do not install tile or slab. What we can do is connect you with contractors our showroom teams work with and trust, and supply the materials the job calls for. Call your nearest showroom, or reach us at (559) 275-5000 and we will point you to the right location.
How much do porcelain slab shower walls cost?
Material for gauged porcelain panels generally runs about $15 to $30 or more per square foot, depending on the manufacturer, the print resolution, and whether the finish is polished or matte. At that range it sits alongside premium large format tile and high-end natural stone. Installed cost is where slab separates from tile. Published figures for a finished assembly run roughly $100 to $250 per square foot, and where a project lands in that range depends on local labor more than on the slab itself.
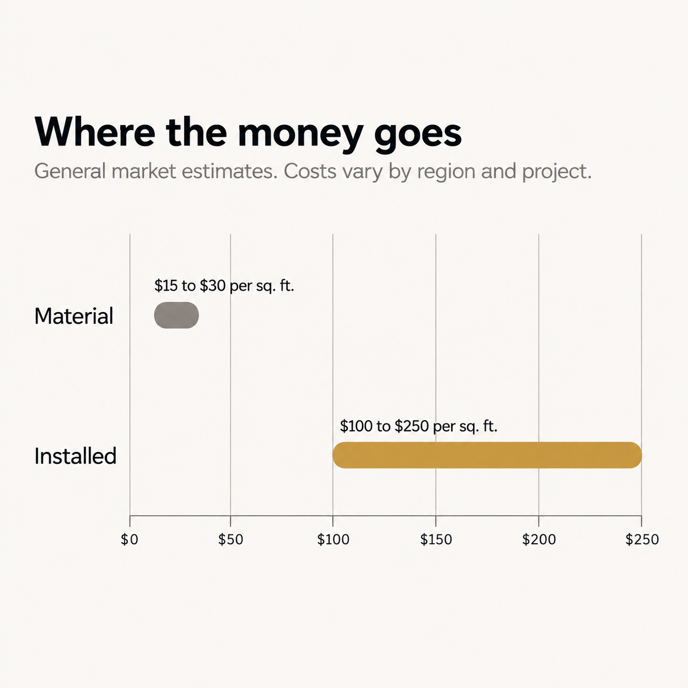
Four things drive that spread:
A tile job runs on a setter and a helper. A slab job needs three or four people just to carry and embed the material safely.
Substrate preparation to hit the ANSI flatness tolerance adds days of labor and material before any porcelain goes up.
Contractors spread the cost of thousands of dollars in equipment across their jobs, including extended wet saws, suction frames, and lippage clips.
The installer carries the breakage risk. Ruining a panel during a plumbing cutout comes out of their pocket, and that risk is priced into the labor rate.
Niches, benches, and inset windows push the number up too, because each one means more cuts, more mitered edges, and more chances to lose a panel.
When traditional tile is the better call
Slab is not the right answer for every bathroom, and we would rather say so before you order. Three situations point back to tile:
If a rigid 5-by-10 panel cannot make the turn up the stairs or through the door, the material is off the table. A 24x48 porcelain tile gets you close to the look.
Curved walls, multiple benches, deep windows, and several niches force the slab to be cut into pieces, which gives up the continuous look and adds mitered edges that chip easily. Tile and mosaic handle a complicated shower better.
If the budget cannot absorb the premium labor, a well-waterproofed tile installation by a good setter will outlast a spot-bonded slab set by a crew learning on your bathroom.
Pairing slab walls with a shower floor
Wall panels and shower pans are different specifications. A polished wall panel is not made to be walked on wet, and the floor has to slope to the drain, which means smaller pieces. For wet interior floors the minimum is 0.42 DCOF under ANSI A326.3, and a common shortcut is to pair slab walls with a rated mosaic or small-format tile on the pan in a matching color. Our guide to understanding DCOF explains how to read the rating, and our shower tile range covers both surfaces.
Caring for porcelain slab shower walls
The face of the slab needs almost nothing. Warm water, a soft cloth, and a pH-neutral cleaner handle normal use, and hard water spots come off without special products. Acidic cleaners that would etch a marble wall do nothing to porcelain.
The silicone joints wear out. Inspect the corners and the floor transition once a year, and have the silicone replaced when it discolors, pulls away, or splits. That is routine on any shower, and on a slab shower it is close to the whole job. Our installation, maintenance and care resources cover the rest. For anyone tracking indoor air quality on a remodel, Magnifica porcelain is GreenGuard certified and produced in a GreenGuard-certified facility.
Common questions about porcelain slab shower walls
Can you install porcelain slab shower walls yourself?
No. A 5-by-10 panel takes a minimum of two people and usually three or four, plus vacuum suction frames, an extended wet saw, and lippage clips. Before it is bonded to the wall, the panel bends and snaps under its own weight. Porcelain slab is the one bathroom surface with no reasonable DIY path.
Do porcelain slabs need to be sealed?
No. Porcelain is fired to the point of full vitrification and absorbs less than 0.5 percent water, so there is nothing for a sealer to penetrate. Natural stone is the material that needs sealing on a schedule.
What happens if a porcelain slab cracks?
The whole panel comes out. There is no patching a slab the way a contractor can grind out grout and swap a single cracked tile, so a structural crack means removing the shower glass and plumbing trim, demolishing the panel, and often repairing the waterproofing underneath. That is the strongest argument for paying a certified installer the first time.
Can you use the same slab on the shower floor?
Usually not. Polished wall panels generally do not meet the 0.42 DCOF minimum for wet interior floors, and a pan needs slope to the drain that a single large panel cannot provide. Pair the walls with a rated textured mosaic or small-format tile instead.
How is a porcelain slab different from a porcelain countertop slab?
Same material, different thickness. Countertop slabs are made heavier, typically 12mm and 2cm in our Magnifica line, to carry load across an unsupported span. Wall panels are thinner because the wall carries the weight, and a thinner panel is easier to lift and cut.
See the slab before you commit
Veining, color, and finish all look different in a bathroom than they do on a screen, so we would rather you hold the material before you buy it. Order $1 samples online, or take five free with code SHIPFREE5 on your first sample order, and look at them in your own lighting at the time of day you actually use the shower. When you are ready to see full panels, come into one of our 44 showrooms, where you can view slabs at full size and we can connect you with installers in your area. Call (559) 275-5000 and we will get you to the right showroom.
Order tile samples or browse our slab collection and Magnifica porcelain slab to start.

